
Digipak Front and Back Cover
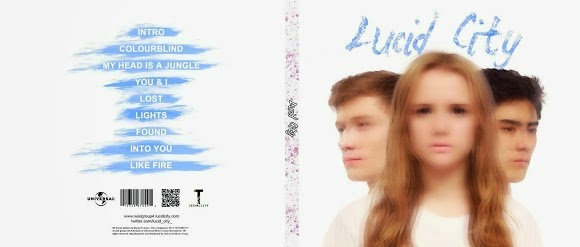
Our digipak front and back cover
Digipak Inside Cover
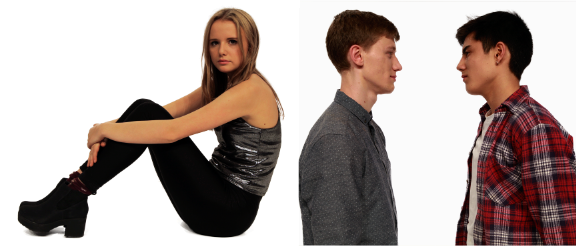
Our digipak inside cover
Click on the image to open our website in a new tab
Click on the image to open our website in a new tab

Friday 25 October 2013
Monday 14 October 2013
Sweded Films
A Sweded film is similar to a spoof, usually using the most well known scenes in a film and summarising them to make it last no more than about five minutes. Typically, no soundtrack, titles or any other effects are added afterwards, and are all filmed with the footage.
Two examples of sweded films:
Edward Scissor Hands
Ghostbusters (from the film Be Kind Rewind)
Dexter title sequence re-edit: Evaluation
1. Summarise the conventions of title sequences that were most important to this task.
Title sequences are important for crediting the people behind the scenes as well as on screen in a film, and can also be used to help establish the genre through using a certain font, colour or technique. They should add to the sequence rather than distract the viewer from what is happening, but can be the main feature of the sequence, depending on what kind of opening it is.
2. How did your group plan to edit the title sequence? (consider timings, industry requirements etc).
The task was simple enough for us to complete it in the one lesson we were given, so there was no need to plan out how much time to spend on each aspect of the editing. We took it in turns to do one title each at a time, rotating round our group of three. We planned on having quite a few titles as lots are needed to credit the main people involved. At the beginning of the task, we thought we should have titles constantly on the screen over the shots, but after testing this by having one credit last for two shots, we decided it looked a bit strange and so decided to only have titles over shots that lasted long enough.
3. Explain the creative decisions made by your group.
Our group agreed that we wanted the titles to portray the genre, which in this case was crime/horror/thriller. We took some inspiration from the main 'Dexter' title card at the beginning, and decided to use a grungy font in a dark red, a colour which reflects the violence of the programme and ties in with the bloody images featured in the title shots. The actual footage was a very important part to this sequence and we didn't want to distract from it too much, so we decided that the best place for most titles would be the bottom or the corners of the screen. They were still visible, but it is obvious that they are not intended to be the main focus.
4. How does your re-edit compare to the original?
Our edit fits the genre well and our ideas were creative, but I think that the original title sequence is more effective. The original uses different transitions for each title and a simpler font, which doesn't distract the eye as much as ours does, and the transitions we chose to use were all simple fade ins and fade outs, which aren't as creative or interesting. The original also contains more titles than our version due to time constraints, and I think this adds to its effectiveness as it is more informative, which is one of the main purposes of a title sequence. However, our titles are more continuous in size and placement and so flow better throughout the sequence.
Sunday 6 October 2013
Preliminary Task Evaluation
1) Who did you work with and how did you manage the task between you?
Our task was to plan, film and edit a sequence that includes continuity techniques. I worked with Audrey and Brandon, and although none of us were keen on being the actors at first we eventually decided that they would play the characters in our scene as they study Drama. This left most of the camera work and directing to me, except for when filming the shots Brandon wasn't in and he took over the camera. While planning, we made sure each member of our group had their ideas heard, and that everyone was happy with each aspect before moving on. We divided the editing between us equally to make sure that we all experienced using the software and contributing to the finished product.
2) How did you plan your sequence? What processes did you use? What theories did you try to take in to account?
We started by discussing our ideas, which at first were non-existent, but we agreed that we wanted a sequence that appears to be of a serious genre, but turns out to be comedy. Eventually it was Brandon who came up with the idea for the character's dialogue to be taken from song lyrics and spoken dramatically. The song we chose was We Are Never Ever Getting Back Together by Taylor Swift, the lyrics of which are very well known, so the audience will know straight away that it is intended to be funny. This also meant that our sequence was really easy to script and so overall, the planning didn't take us very long.
We drew the storyboard bit by bit as we checked first that the shots would work in the space we planned to use. From our storyboard we devised a shot list and a shoot board so that it was clear to all of us which shots we needed to film and how many different set ups were needed for those shots.
While planning our shots we tried to take in to account what was needed for a continuity sequence to flow well, such as match on action and sticking to the 180 degree/30 degree rule. We found that we had to make adjustments from some of our original shot ideas as they broke these rules and would have ruined the narrative flow.
3) What technology did you use to complete the task, and how did you use it?
The equipment we used to film our shots were: a Canon HV30 camera, a tripod, headphones, a shotgun microphone and a clapperboard. As I was the only member in my group not acting, my role largely involved operating this equipment, but as I had used similar equipment for GCSE Media projects I didn't find it too challenging.
Editing using Adobe Premier Pro was fairly simple. We imported our clips, selected the best take of each shot, cut them down using in points and out points, and dragged them in to the right order on the timeline. We had to watch it through a number of times to make sure it flowed nicely, which it did after we had made some changes. Then we played about with the grading until we were happy with the colour, rendered it and exported. The main principles of it are similar to editing software I had used before, but I found it useful to be able to expand my editing skills.
4)What factors did you have to take into account when planning, shooting and editing?
When planning our sequence we had to carefully plan where to place the camera to get the right angles and/or distance for the shots we wanted. Most shots worked out fine without needing to make any changes, and for others it just meant moving tables and chairs out of the way.
While filming, we had to take in to account that the two other groups in our class also needed to film shots in the entrance to the media block, and so we had to organise our time well and film our shots efficiently so as not to delay other the groups' schedules. Working with time constraints wasn't much of a problem for our group as actually finished with time to spare. Another factor we had to take in to account when filming was the microphone picking up extra background noise, so we made sure that people not being filmed were quiet and didn't affect the sound in the shot being filmed.
Some of the shots we had planned to use didn't work as well as we had hoped when we came to edit them, and so some we scrapped and some we substituted with a shot from a different angle or a different take.
5)How successful was your sequence? Please identify what worked well, and with hindsight, what would you improve/do differently?
Our sequence was quite successful as we managed to abide by the rules of continuity for the most part. For example, the two shots of Audrey walking through the door, one from outside the room and one from inside, present good match on action, and I would say that our use of shot reverse sot links the dialogue well, without any overlapping or gaps. However, at some points such as at 00:12 seconds, where we broke the rules of continuity. It cuts from a shot where Brandon's arms are folded to one of a different angle where they are open, which is confusing for the audience and may distract from the effectiveness of the sequence. Therefore, in hindsight, we should have rehearsed the character's movements as well as the dialogue to ensure that we could match up the shots.
If we were to do something differently, I would have planned more interesting shots to open with, as the wide shot is pretty basic and I don't think we were challenging ourselves to be as creative as we could be.
6)What have you learnt from completing this task? Looking ahead, how will this learning be significant when completing the rest of your foundation coursework, do you think?
I have learnt that the rules of continuity seem simple in theory, but are a lot more effort to stick to when put in to practice. This, however, has helped me to understand the importance of continuity and I will be able to use the techniques learned in this to benefit future projects.
Wednesday 2 October 2013
Art of the Title Grid Activity
.jpg)
The font used for the titles is fairly simple so as not to distract from the shots in the opening, which provide most of the information. The colours used establishes the tone of the film by representing two main themes in the story: dark and perhaps disturbing.
The opening is intended to be ambiguous in order to intrigue the audience. Most of the shots are close ups which focus the eye on important information without revealing to much; this keeps the audience's attention as they want to find out more about the character and the plot.
Three things that we included in the grid that are important to the construction of an opening sequence:
- We opened with an establishing shot of Louis entering a room underground which tells the audience that he is a main character and suggests that the dark underground room is an important location in the film.
- The close up shots of objects in the lab and the angles used establish the genre as they are supposed to make the viewer feel uncomfortable, which is typical of the thriller genre. This sets the tone for the rest of the film.
- The titles naming the director, producer, actor and the film title are very important to the film as they inform the audience who helped to create the film and revealing the title gives the audience more clues as to what the film is about.
Subscribe to:
Posts (Atom)