Before the shoot for our music video began, we got Georgie to practice lip-syncing to our song. This was partly to get an idea of how she would perform for the actual shoot, and partly to help her learn the lyrics and feel more confident for the first real shoot. We were happy with how she performed, and are sure that we made the right choice in casting her as she is confident in the role we have given her.
The video of Georgie's performance rehearsal:
Digipak Front and Back Cover

Our digipak front and back cover
Digipak Inside Cover

Our digipak inside cover
Click on the image to open our website in a new tab
Click on the image to open our website in a new tab

Showing posts with label A2 research and planning. Show all posts
Showing posts with label A2 research and planning. Show all posts
Saturday, 8 November 2014

Shoot-board
Before deciding which shots to film in which allocated slot of studio time, we first made a list of all the shots we need from each set-up, and which costumes, props and people are needed for each one. To do this, we used a shoot-board. Below are examples of our shoot-boards for a range of shots in the white scenes (click to enlarge).


Using the shoot-board, it was easier to allocate each scene to a slot we'd been given as we had a rough idea of how much time each scene will take and which actors we need to be available.
Call Sheets
 |
| Example: call sheet for our first shoot |
We made a call sheet for each shoot, which details the start/end times and location for the shoot, the role of each person in our group, times actors are needed for make up and on set, and what set/props are needed.
We worked out the time each person is needed by figuring out how long we need to set up, how long the cast need to get into costume and apply make-up, and how long each shot will take (which we estimated on our shoot schedule).
The call sheet helps the shoot run smoothly as it is clear where and when actors and crew are needed, and what needs to be ready at what time.
Schedule of Studio and Location Shoots
Each group has allocated times when the Seward Studio is available to them. In these tables, the times when my group (group 4) has the studio is shown in red.


Using this and the shoot board, we made more specific shoot schedules which detail when we are shooting each scene, when to start setting up, how much time to spend on each shot and which actors we will be using.
Here is the shoot schedule for our first shoot:


Final Kit List
This is a list of the equipment available to us in the studio:

We will also be using a GoPro for some of the balloon scene and forest scenes, for point of view and slow motion shots.
In the studio, for some performance shots we will use a GlideCam to increase the range of shots in our performance beds.
Friday, 7 November 2014
Production meeting 07/11/14
After realising that planning to film a powder paint fight in a forest in the winter was pretty unrealistic, we decided to do a location recce on the recreational ground behind the school to see if it would be suitable back up location. We took a Legria HFG30 camera with us to test what it would look like on film.
This is a video of some of our footage:
The trees can be framed to cut out the fence in the background, so that it looks like it could be part of a real forest. It would be much easier to shoot here as it we won't have to rely so heavily on having good weather and it will be easier to organise enough extras.
We decided that it is a more suitable location than an actual forest so we are now planning to film there instead.
 |
| Filming test footage |
This is a video of some of our footage:
The trees can be framed to cut out the fence in the background, so that it looks like it could be part of a real forest. It would be much easier to shoot here as it we won't have to rely so heavily on having good weather and it will be easier to organise enough extras.
We decided that it is a more suitable location than an actual forest so we are now planning to film there instead.
Friday, 31 October 2014
Lighting and Set Design
Our music video will be structured around four set-ups, each with different lighting and props. These are: band performance, the white set-up, the balloon scene and the paint fight.
Lights
The video below shows us experimenting with different positioning and colours of the lights while programming them for this scene.
We decided on having two blue lights on each of the DJs and two pink lights on Georgie with no other lighting around them. This is so that the lights are not too bright, to keep a contrast between this scene and the bright colours of the other scenes to make sure it is obvious performance is separate to the narrative. However, we will be using the white backdrop.
Props
- Microphone & stand
- A sound board for one DJ
- A keyboard for the other DJ
- Signs in the background (inspired by the signs in the forest in the 1951 Disney Alice in Wonderland film)
 |
| Scene from AIW film |
 |
| Examples of props similar to what we want to make |
- Giant playing cards hanging from the ceiling (also in keeping with the AIW theme)
 |
| Example of hanging playing card props |
White scene
The set will be empty and white apart from a cupcake on a table in the centre. Georgie walks in the eats the cupcake.
Lights
Very bright, white lights (using all the lights) and a spotlight on the cupcake.
Very bright, white lights (using all the lights) and a spotlight on the cupcake.
 |
| Setting up the spotlight for this set-up |
Props
- Table
- Cupcake
Balloon scene
Balloons all over the floor, Georgie and the two DJs with 5 or 6 extras dancing, messing around with the balloons.
Lights
Mainly white (dimmer than for the white scene) with pale blue lights on the backdrop.
Mainly white (dimmer than for the white scene) with pale blue lights on the backdrop.
Props
Before making the prop for the real we, thing decided to test it out to see if the structure would hold up the balloons and if it would actually look convincing. After a successful trial, we have decided to go ahead and make a bigger, correctly coloured balloon mushroom for the real thing.
- Purple, blue and marbled balloons all over the floor
- A mushroom prop made out of balloons (wire and papier mache base with balloons attached)
 |
| Examples of what the balloon mushroom will look like |
 |
| Ellie with our trial mushroom |
Forest scene
A clearing in the forest with Georgie, the DJs and 8 or 9 extras having a paint fight.
 |
| Images which provided inspiration for this |
Lights
We won't be able to have proper lights so we will be relying on natural lighting.
We won't be able to have proper lights so we will be relying on natural lighting.
Props
- Powder paint
Costume, hair & make-up
White scenes
Georgie: casual clothes, make up simple but bold enough to stand out on camera (e.g. mascara, thick eyeliner, red lips)

Forest
Georgie: same as white scenes as they join up
Performance
Georgie: smoky make-up, sparkly jumpsuit, black high heels

DJs: short sleeved shirts open over white t-shirts, jeans
Balloons
Georgie: Purple disco pants, tie-dye t-shirt, trainers. Bright coloured eyeshadow (pink and blue to match the colour scheme of the balloons)
Gavin: bright patterned shirt, jeans, trainers.
Eugene: bright patterned shirt, jeans, trainers.
Extras: one crazy/funky/patterned item of clothing each with everything else dark/plain (e.g. black or dark jeans/shorts/skirt)
Paint fight

Gavin: white t shirt, dark jeans
Eugene: white t shirt, dark jeans
Extras: white top and dark bottoms
Casting
Female lead

Georgie Thoupos
We chose Georgie because, as she has acted and lip-synced in previous media projects, she is a confident and experienced performer. Georgie took media at AS level so she understands the commitment needed to a project like this. For these reasons, we feel that she meets all the criteria needed for the role.
DJs

Gavin has had experience performing in media projects before, including a music video, and so he is confident in front of a camera. He is also a media student working on his own music video, so we know that he will understand the pressures of this and will be reliable and hard-working.
 Eugene Leach
Eugene has no previous experience in performing. However, he is confident and is friends with Gavin, our other DJ, so they should have chemistry when on screen together. As he is the brother of a member of our group, we are sure that he will be reliable, cooperative and committed to the project.
Wednesday, 22 October 2014
Publicity Shots
For our publicity shots, we want a mix of serious and fun shots to match the serious performance and more fun narrative sides of our video. We also plan to take promo shots during the filming of our video, using the set-ups and costumes form each scene, to create synergy between the two. We think that the using the balloons as props, particularly their static charges, and the fun nature of the powder paint fight will create the playful image we are going for. However, shots from the performance set-up and set-ups specifically for publicity shots will help create a balance between fun and serious, ensuring that they are taken seriously as an artist.
We plan to get individual shots of Georgie, and of just the DJs without Georgie. This is to give us a wider range of composition and framing, which will make the selection of photos on our website more interesting.
When researching influences for the shots, we found this publicity image of Ellie Goulding. We really liked the over-layed images and are hoping to do something similar with our promo shots of Georgie.
 |
| Ellie Goulding |
As we are going for a mixture of fun and serious shots, we took inspiration from Disclosure's publicity shots for shots of the DJs. They often mess around but also pose for serious photos, which is what we are hoping to achieve with or DJs.
 |
| Disclosure |
For shots of all three members of our artist, Paramore were a main influence, as they consist of a female lead and two males. The style of their promo shot below inspired us in two ways:
Our main aim with the publicity shots is to get a wide range of set-ups and costumes. Therefore, as well as taking photos in our video set-ups, we are also going to schedule several other shoots with various different costumes and lighting.
- The two male artists dressed in black while the female stands out - we want Georgie, as the lead, to be the main focus of the collective.
- The coloured light on them - similar to the powder paint shots we want to get.
 |
| Paramore |
Our main aim with the publicity shots is to get a wide range of set-ups and costumes. Therefore, as well as taking photos in our video set-ups, we are also going to schedule several other shoots with various different costumes and lighting.
Website design & influences
When brainstorming ideas for our website, we decided on several main features we would like:
The inspiration for this came from the websites of existing artists, including:
The Disclosure website has the artist name and links along the top of the page, and three columns of posts including photos, videos and sound clips.
The 1975 website also has a blog-style format, allowing the user to scroll through pictures and videos of the band.
The Beyoncé website has a banner across the top and an endless scroll format, filled with pictures and links.
After deciding these features, we came up with a flatplan:
- Blog-style: the visitor is able to scroll through pictures, sound clips and links to social media posts
- A banner across the top
- The links list across the top
- Colour scheme to match the powder paint in our music video and our album cover (blue, pink, purple)
The inspiration for this came from the websites of existing artists, including:
 |
| Disclosure |
 |
| The 1975 |
 |
| Beyoncé |
After deciding these features, we came up with a flatplan:
 |
| Flatplan for our website |
This is a very basic outline of our plans for the website.
The banner across the top will contain our artist logo, into which we want to incorporate powder paint in the colours of our chosen scheme.
The main page will be much more lively and engaging, including images, videos, links to social media pages for the artist, sound clips and adverts for competitions.
In addition to this, we will use a font for the website more suited to the image of our artist, and a blue, pink and purple colour scheme rather than black and white.
The menu of links across the top will include all essential pages so as not to crowd it - options such as 'about the artist' will have drop-down menus to take the user from the home page to a certain branch of the page.
Album cover design & influences
Before we began to design our own album artwork, we researched the conventions of existing album covers. We found that they tended to have one striking image or focal point, often (but not always) the title of the album and the artist name, a theme throughout every panel of the album to create branding, and industry necessities such as the barcode and copyright information.
We decided on a few main features we wanted for our album artwork, such as sticking to the colour scheme of our video, involving powder paint in some way, and having a picture of the artist on the cover.
Next, we began to think about the design of our album, taking artistic influence from a number of existing album covers.
Dance music albums
 |
| Example - Live Life Living Caribou - Our Love Flying Lotus - You're Dead SBTRKT - Wonder Where We Land |
.
Other inspiring albums
 |
| MGMT - Oracular Spectacular San Cisco - San Cisco Vampire Weekend - Contra |
 |
| Paramore |
These are our first rough plans for the design of the front and back cover of our album artwork:
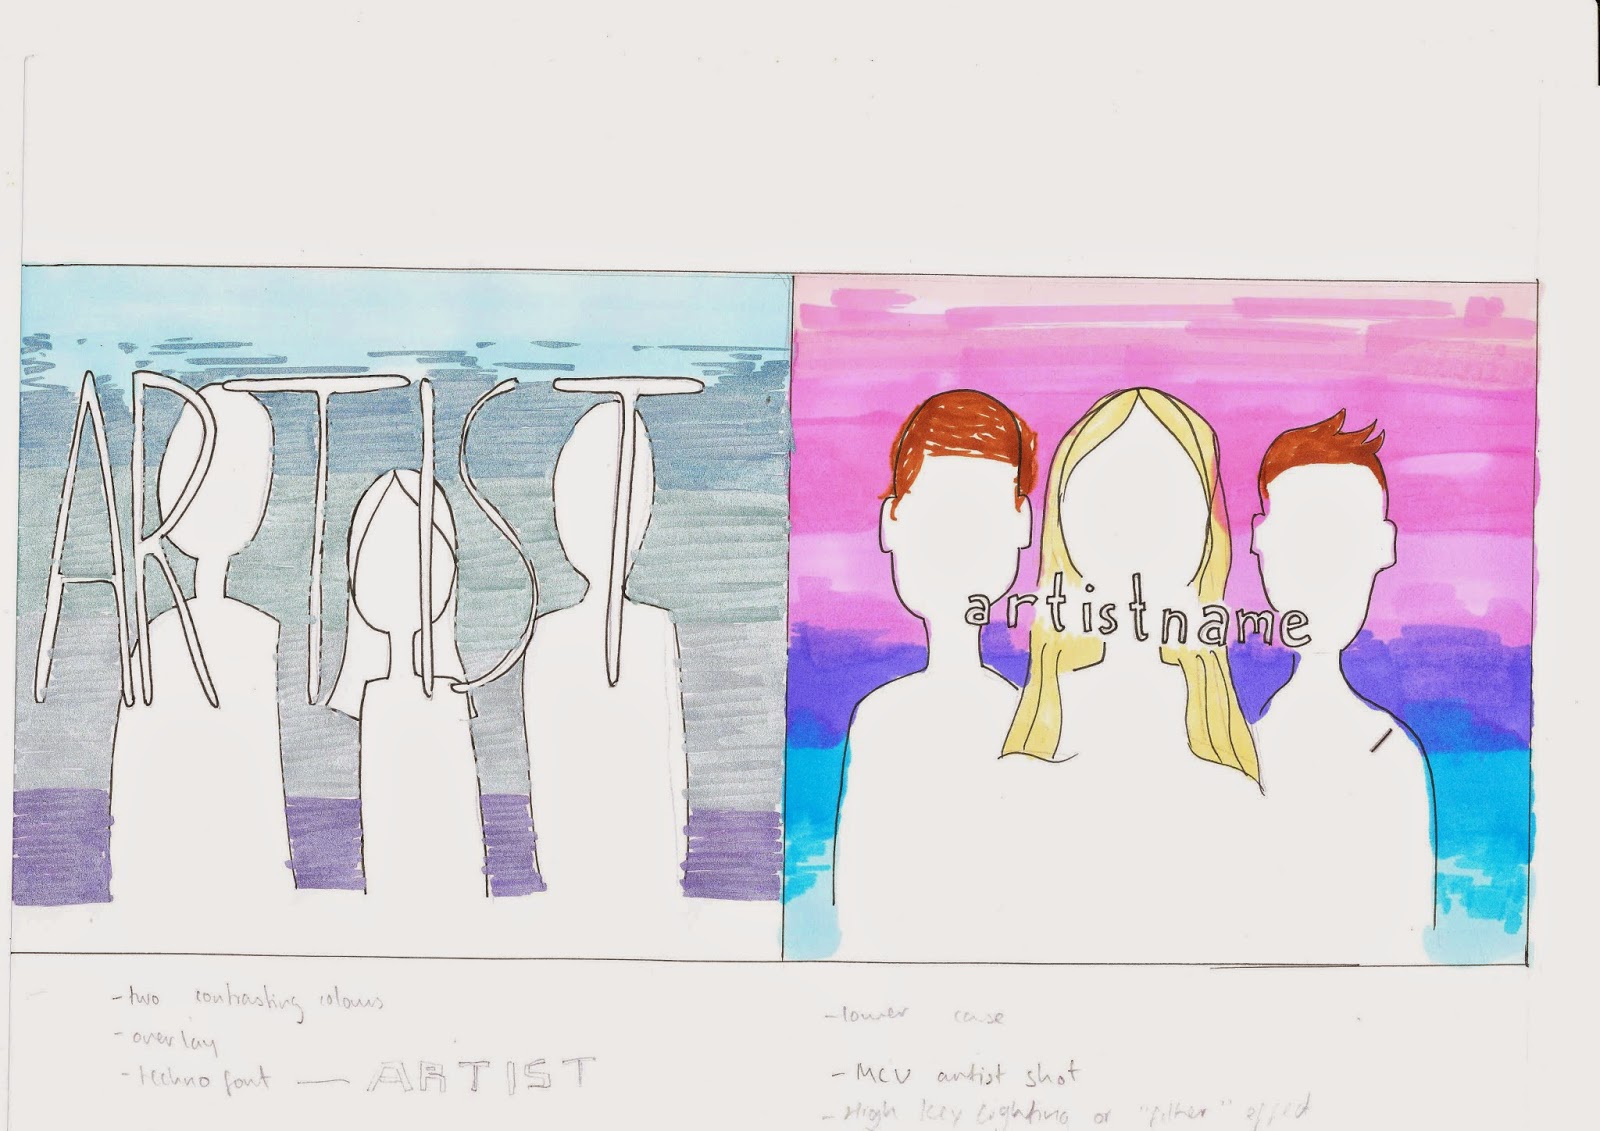 |
| Front cover: two possible variations |
 |
| Back cover |
The image of a group of friends in a forest on the back is the same place the powder paint fight will take place and is meant to create synergy between our video and the album, the same way the powder paint colour scheme will.
 For the inside cover, we plan to have a photo of our female artist blowing powder paint across the two panels, similar to the image to the right. In our shot, the paint will be the same colours as our colour scheme with a white background to emphasise the vibrancy of the colours.
This colour scheme is something that we plan to use across our video, digipak, and website to create a strong sense of branding for our artist's debut album, which is a technique used throughout the music industry.
Production meeting: deciding specifics of set-ups
In today's production meeting we first decided on exactly how many different set-ups we would have and what the main idea for each would be. The basic scenes we needed were narrative and performance. We have decided to split our narrative into three scenes (empty white room to introduce the narrative, balloon party, and paint fight in the forest), and to split our performance into two set-ups (normal and neon).
After deciding this, we began to discuss some specific props, costume, composition and shots we wanted for each set-up.
Here are the notes from this meeting:

Make-up guidance (17/10/14)
The rest of our notes from the meeting:


Friday, 17 October 2014
Props List
The props we have decided to use so far are:

- Piñata
- Powder paint
- Balloons for floor
- Balloons for mushroom
- Sign posts
- Neon paint
- Neon make up
- Giant playing cards
- Styrofoam balls
- Papier mache mushroom
Some of these can be made or borrowed, but some of them will need to be bought.
We have started to search for websites that sell the props we need online, and so far have found some balloons and a piñata that will look right for our video.
We have decided to buy the powder pant in large quantities and fewer colours as we need a lot of it for our shoot and promo shots, and so are purchasing it from the ELC website. This also means that it is safe (in case it gets in someone's eyes/mouth/etc) as they supply thier products for young children.
 |
| Powder paint supplier |
Production meeting 17/10/14
In our prouction meeting today we talked through the technicalities of shooting our music video with Chris, the media technician. He gave us advice for our ideas that would need special technology:
We are able to plan in more detail after this meeting as we now have an idea of what is and isn't possible to achieve.
- Slow motion shots: he recommended that we film in 50fps on the GoPro or the Canon 5D. however, as we have planned the slo-mo shots for the paint fight, we thought it best to use the GoPro as it has a protective case, whereas the 5D could get ruined b the paint.
- Neon performance: the media department only has one black light which would not be strong enough to make this possible. He suggested we test it anyway, or film in normal lighting with dark make-up and then invert the colours in editing for the same effect.
We are able to plan in more detail after this meeting as we now have an idea of what is and isn't possible to achieve.
Request for permission to use the track
In order to obtain permission to use our chosen track, we had to request it from the record company which owns the rights to the song. After searching online for the right person to contact, I sent an email on behalf of my group to the record label which owns the MK remix of 'My Head is a Jungle':


However, they also sent us a document with a few conditions we have to stick to if we are using the track:

The gist of these conditions is that we must acquire the song by legal download or purchase, and the final project must not be broadcast publicly or commercially. As we plan to upload the video to YouTube, we saw this as a huge problem. However, there are other websites such as Vimeo were we can upload the video and keep it private, and so therefore, our request for permission was successful.
Thursday, 16 October 2014
Production meeting 16/10/14
In our production meeting today we tested using overlays of pieces of footage.
Our initial idea was to project footage from Disney's 1951 Alice in Wonderland over our artist while we filmed it, but after realising that the projector would not be strong enough to be picked up by the camera, we decided to use overlays instead.
Our idea is to have footage from Disney's 1951 Alice in Wonderland over the top of our female artist during some parts of the narrative. To test this, the group filmed me acting as we want Georgie to in the video, and edited it with the Alice in Wonderland footage over the top by changing the opacity.
We were really pleased with the result (which is shown below) and so we will definitely be using this technique for the real video.
Animatic
We made the animatic to help us to plan the specifics of our different set-ups, and to plan the sequence and timings of the shots. The different colours for different scenes allowed us to vaguely visualise what the video will look like and what order the shots should go in.
Scene key
Green - forest scenes
Pink - performance
White - white backdrop scenes
Blue - balloons scenes
Black - neon scenes
After creating the animatic, it has made it much clearer in my mind what we want the final product to look like and how the different scenes will fit together. This has also made it easier for us to make a shot list as we have a reference for what shots we want to get.
Storyboard
As part of the planning process for the video, we made a storyboard:

- By colour-coding the different set-ups (yellow for forest scenes; pink for performance scenes; orange for white scenes; blue for balloon scenes; blue&highlighter for neon scenes) we were able to visualise the sequence more clearly, which helped us to decide how to order the different scenes.
- We weren't able to plan every single shot for the storyboard as a lot of our shots will depend on what we film on the day, as some of it will be improvised (e.g. paint fight, balloons).
- Making a storyboard was important as we were able to make sure that the shots we did plan will fit together well.
- We all contributed to the storyboard. The artists did most of the drawing but we all had a say in what each shot should entail, which shots went where and how long they should last.
Subscribe to:
Posts (Atom)