


Using Adobe Premiere Pro, we began editing before we had completed all of our shoots. This made it difficult to edit the shots we had got coherently as much of what we had planned relied on improvised shots in a montage type sequence. However, we used our animatic to help us place shots temporarily into where we had planned.
As we began to place the shots where we had planned, we discovered that the pace of the white scene shots at the start meant that we had to cut out the forest scenes we had planned and so we cancelled the shoot for these. These were not the only shots that we found we had planned too much or too little time for, as we frequently changed the placing and timing of the shots we had when we got new footage or found a clip that went better with the music at a certain point.
We also realised early in the editing process that, following Carol Vernallis's theory of music videos, it would suit our video to cut the shots to the beat of the music. This was not the style we had used to begin with, and so it required us to go back through our edit and make the necessary changes.
After filling most of the timeline with footage, we found that there was a section of the video that was a bit slow and dull to watch. In attempt to make this bit more interesting, we tried out an inverted effect on performance shots of Georgie, fading between normal footage and footage with the colours inverted.
However, this didn't create the effect as we had hoped for.
Next, we edited a rough cut of the ending of the video, which included a cross-dissolve from the balloon scene back to the white room for the final shot. We created the cross-dissolve to the ending shot in the white scene by linking a shot of Georgie throwing a white balloon towards the camera with a shot of Georgie in the white room with a 'cross-dissolve' transition. This made the shots fade together, creating a 'dissolve' effect.

 Among other things, he suggested that we edit in more effects and make the editing more fast-paced to give the ending more impact, making it memorable for the viewer. We followed his advice and included effects throughout the video, some of which we placed in the end sequence. We also made the editing faster paced as he suggested, which we all agreed was an improvement. here is a video of this cut of the ending:
One of the other effects we created after receiving feedback from Chris was a blurred effect create by layering two pieces of footage, lowering the opacity and delaying one:

We also added in reverse shots. We did this by placing a shot on the timeline, copying it and changing the speed of the copy to 'reverse speed'. We then placed the two shots next to each other, creating an effect shown in the GIF below, where the paint seems to fly out of Eugene's hands and back into them again:

Our next step in the editing process was grading the shots. The overall effect we wanted to create with the grading was a bright, poppy feel for the video. We achieved this by adjusting the brightness, contrast, hue and saturation of the footage using 'ProcAmp' and the 'Three Way Colour Corrector' in Adobe Premiere Pro. Two ungraded and grade shots, and the tools we used for this are shown in the pictures below. The grading tools are on the left, with the ungraded shots in the top right and the graded shots in the bottom right:
As we began to place the shots where we had planned, we discovered that the pace of the white scene shots at the start meant that we had to cut out the forest scenes we had planned and so we cancelled the shoot for these. These were not the only shots that we found we had planned too much or too little time for, as we frequently changed the placing and timing of the shots we had when we got new footage or found a clip that went better with the music at a certain point.
We also realised early in the editing process that, following Carol Vernallis's theory of music videos, it would suit our video to cut the shots to the beat of the music. This was not the style we had used to begin with, and so it required us to go back through our edit and make the necessary changes.
After filling most of the timeline with footage, we found that there was a section of the video that was a bit slow and dull to watch. In attempt to make this bit more interesting, we tried out an inverted effect on performance shots of Georgie, fading between normal footage and footage with the colours inverted.
We then tried overlaying two pieces of footage of Georgie's performance which we felt looked better, however after receiving feedback from our teacher who thought that it ruined an otherwise strong performance, we decided to cut it and try out a different effect. In another attempt to liven up this part of the video, we tried fading to black between shots, which looked like this:
However, we felt that this was a bit random and did not fit with the rest of the video.
The next thing we tried was layering footage of the DJs' performance over Georgie's performance. To do this we first had to cut the DJs out of the surroundings in their shots to place them over shots of Georgie without creating unwanted dark lines down the screen where the edge of the shots were. We started by trying to do this in Adobe After Effects, which was extremely time-consuming as we had to cut around the DJs frame by frame. We then realised that we could remove and unwanted sections of the frames using the 'screen' tool on Premiere Pro, and so we tried this as it made it a lot quicker. we then lowered the opacity of the overlayed shots on Premiere Pro to make the shots behind visible through the shots on top. This was the outcome after layering the footage:
 We were happy with this effect as we felt it looked more professional than the others and did not look out of place as we used overlayed footage in other places in the video. Therefore, we decided to use this in the section of the video we had been trying to fill.
The next thing we tried was layering footage of the DJs' performance over Georgie's performance. To do this we first had to cut the DJs out of the surroundings in their shots to place them over shots of Georgie without creating unwanted dark lines down the screen where the edge of the shots were. We started by trying to do this in Adobe After Effects, which was extremely time-consuming as we had to cut around the DJs frame by frame. We then realised that we could remove and unwanted sections of the frames using the 'screen' tool on Premiere Pro, and so we tried this as it made it a lot quicker. we then lowered the opacity of the overlayed shots on Premiere Pro to make the shots behind visible through the shots on top. This was the outcome after layering the footage:
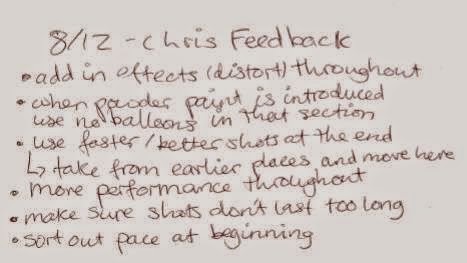
Before making more changes to the ending, we got feedback on our current edit from Chris, the media technician.
Among other things, he suggested that we edit in more effects and make the editing more fast-paced to give the ending more impact, making it memorable for the viewer. We followed his advice and included effects throughout the video, some of which we placed in the end sequence. We also made the editing faster paced as he suggested, which we all agreed was an improvement. here is a video of this cut of the ending:One of the other effects we created after receiving feedback from Chris was a blurred effect create by layering two pieces of footage, lowering the opacity and delaying one:
We also added in reverse shots. We did this by placing a shot on the timeline, copying it and changing the speed of the copy to 'reverse speed'. We then placed the two shots next to each other, creating an effect shown in the GIF below, where the paint seems to fly out of Eugene's hands and back into them again:


The shots that needed the most changes made during grading were those form the footage we shot of the paint fight on the Canon HF G30. This is because this camera produced a lower quality of footage than the Canon 50D, which we had filmed the other half of our paint fight shots with. Therefore, we had to spend longer grading these shots to make them appear to be the same standard in terms of colour and saturation as the shots form the Canon 50D. After grading these shots, the colours of the paint and the trees looked much brighter and colourful, shown from the before (left) and after (right) images below:


After we had finished grading the video, we asked our teachers for some feedback. here is what she suggested:

We followed the advice to fade from black to the opening shot as this is more conventional of music videos, and it made it look tidier as the video opens with lyrics immediately at the start. We also went back to working on our grading of the paint fight shots after receiving this feedback as we were told it did not look as professional as it could.
Another thing our teacher suggested was to make all shots of the paint fight slow motion. However, as we had filmed all of this scene in 60fps, it was hard to slow them down to a speed that would look effective without making the footage look jumpy. Therefore, we felt that it was not worth making this change as they fitted fin with the video at their normal speed.
Another change we made at this stage was layering footage from Alice in Wonderland over the shots of Georgie after she takes a bite of the cupcake. This was a final touch that we had planned from the start as one of several references to Alice in Wonderland thorughout the video.
At this point we had a 'test edit':
After making this change, we had our final edit of the music video. This is available to view at the top of my blog.
No comments:
Post a Comment